Showing posts with label crafts. Show all posts

Friday, October 19, 2012

Cat On the Hat

When we got our Halloween decor out of the attic I thought the skeleton I usually hang on the door looked a little tired.  I saw this cute craft in a magazine (I don't take credit for the idea but the design is mine) and I had an old hat that I wasn't doing anything with  (I certainly wasn't wearing it.) so I thought why not?
 
 
I painted the brim orange, painted the crown black and waited until it was dry.  Then I went back and touched up any spots I'd missed.  Since a straw hat has a lot of texture, you really have to wiggle  your brush into all of those little spaces.  When it was fully dry I painted on a cute kitty face and 'Trick or Treat'. I had to add a 2nd coat on the face details too.  As soon as that's dry it's going up on my door. 

Sunday, March 4, 2012

Marker Caddy Project

I had my markers in this basket for portability as I draw here there and everywhere. But I'm always having to rummage through looking for the one I want. Murphy's Law dictates that the marker you want will somehow burrow itself to the bottom of the basket even if you just used that one. I wanted something that was 1.) portable 2.) allows me to see which markers are where at any given moment and 3.) allows me to store them on their sides as this keeps them from drying out.
I've been collecting these coffee cans. They're the right size and I think they'll stack well.
I took off their lables.
I stuck them all together with some cool looking zebra duck tape.
I then sorted my markers by color.
The caddy can be used either upright, when I'm moving around with it, or on its side when I'm in my office. Probably, if I were doing this project again, I could do something a bit more sophisticated than duck tape but I'll see how this goes for now. So far, it's holding up fine! I also think it needs a handle but I haven't figure that out yet.
 
****UPDATE
After a while, the duct tape started to loosen and the the caddy was listing to one side.  I cut it apart and glued some cardboard inbetween the top and bottom cans to keep it stable.  I wanted to glue them in the first place but the metal rims on the cans lifed them up just enough so they wouldn't touch.  If I had it to do over, I'd use oatmeal boxes which have no rims.  Still, it's functional in the way I wanted.

Monday, January 9, 2012

In Which I do 2 Tutorials I Found on the Web...

...and tell you how they came out.
If you have a 10 (or older) computer game obsessed boy in your home then you'll know what Minecraft is. I made this for my 5th grader who is Minecraft obsessed. This simple design is a virtual creature called a creeper. This shirt was very quick to make using Celtic Mommy's easy tutorial on freezer paper painting. I have used this tutorial before and I really like how simple it is. Freezer paper acts like a simple silkscreen once you iron it onto your fabric. It took me less than an hour to make this design (not including drying time.)
This is another creeper shirt I did for my 8th grader who is also a big fan of Minecraft. I used this tutorial from a great blog called The Craft Patch. I ironed on a square piece of an old black tee shirt using Wonder Under. For the creeper's face I used a piece of light green fabric from my stash, which I then colored with darker and brighter squares in a grid pattern using Prismacolor Markers. I Wonder Undered this over my black piece, marked off where I wanted the creepers face to be and sewed around those lines with green thread. Then I carefully cut away the fabric on top revealing the black. This took me about two hours but I think it was because I had to color those squares onto my fabric. If I hadn't, it would've taken at least a half hour less.
I'm definitely planning other projects using these techniques, they were easy and fun to do! The first one is pretty kid friendly. You do the ironing, they paint inside the design.

Thursday, March 31, 2011

Flowers vs. Snow

Every year the same thing happens:  You think spring is coming, you even see little bits of green starting to push their way through the ground and you're like "It's getting warmer!  Can't wait!" Then....it snows.  Ha ha, April Fool courtesy of Mother Nature. 

The other day one of the kids at work asked me to show her how to make a snowflake.  Urgh.  I didn't want to see any more of those things whether they be actual frozen water or just paper.  So I said I'd show her how to make a flower to color instead and it came out great so now I'm going to show you.


You will need:  an 8 x 10 piece of paper, scissors and nubby, broken crayons with the paper all peeled off.


* Square your paper off.  Fold the bottom corner over to one side like this and cut off that extra bit like this to make a big triangle. Save that extra piece for later!

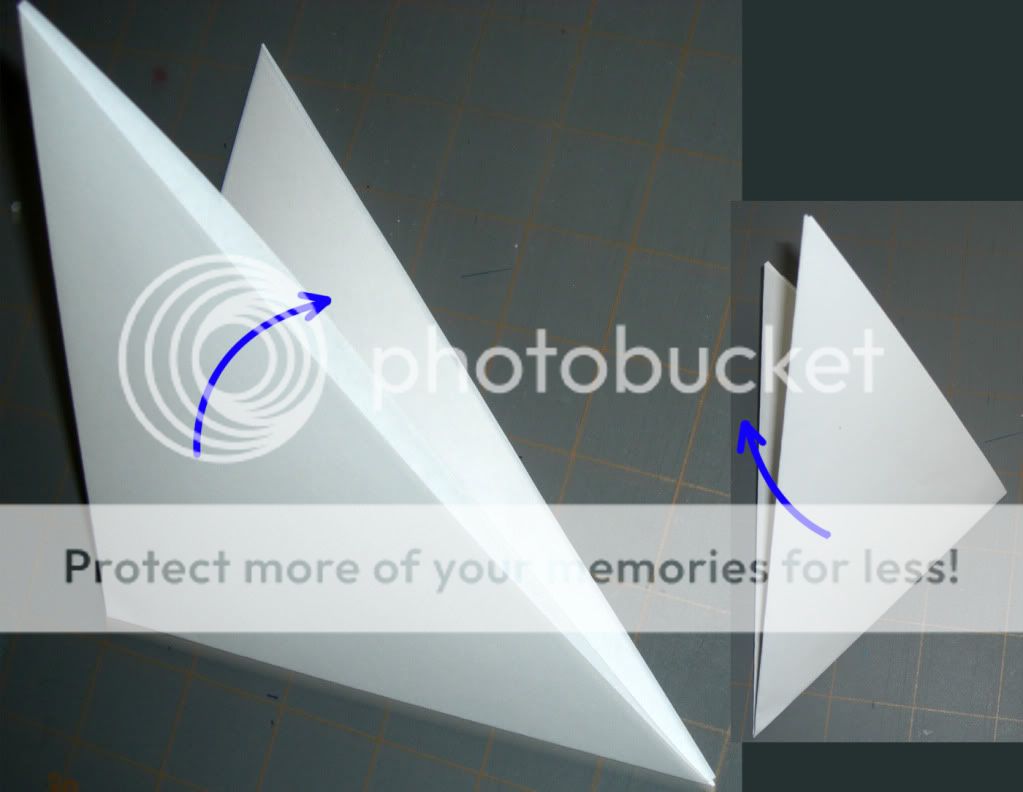
* Fold your big triangle in half and then fold that one in half.
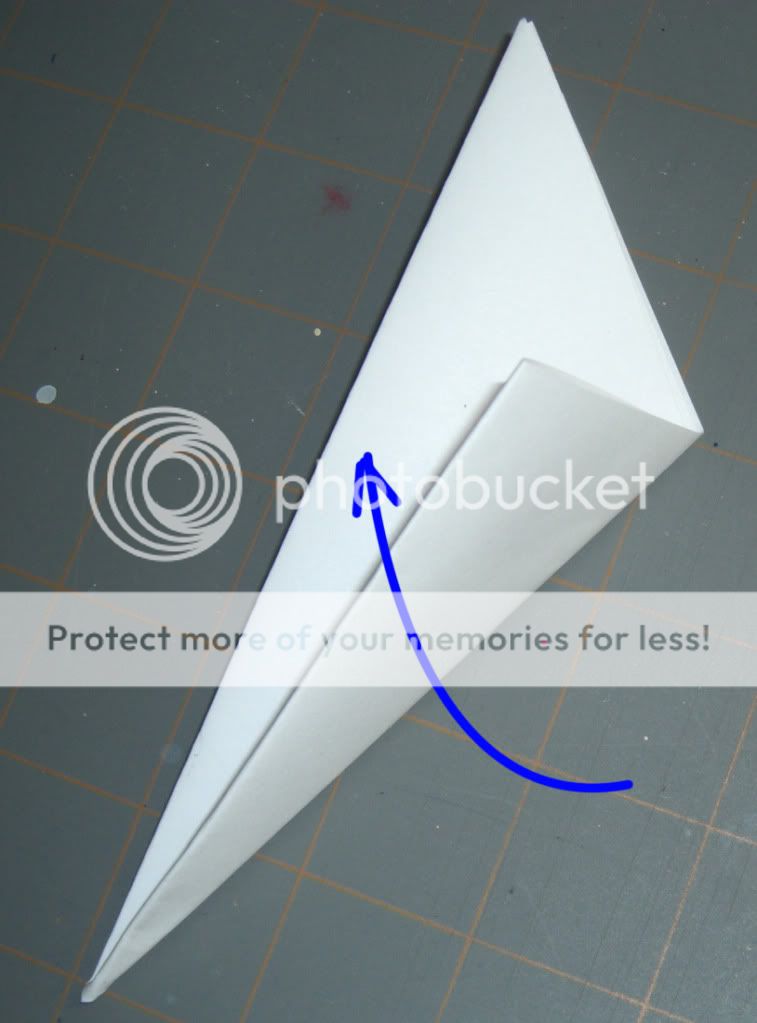
*Now the tricky bit.  Fold the top of your triangle (the side with the fold) over toward the cut edges of the triangle.  It makes this sort of wonky icecream cone shape.
* Cut the top off of the "icecream" so it's now just a skinny triangle.

* Now make the top a little more interesting.  You can round it off, make it jagged or do a swoop like I did.  You can also make some little cuts up the sides and cut the bottom tip off if you like or leave it smooth if you'd rather not.

 * Open it up and it'll look like a snowflake. 

*Take your crayons and rub them from the center to the edges like the spoke of a wheel.  The crayon will be darker on the edges. 

If  you use more than one color it makes a cool gradient effect.

*Take the extra bit from the side that you cut in step one, and make a leaf or two.  Color it in and add some details.

Now make a whole bunch of them and tape them onto your window to blot out leafless trees and brown grass!

Wednesday, October 6, 2010

A New Art Tangent


I was so excited to get my mail this afternoon!   I decided that in addition to making 1 inch digital collages, I'd like to make my own magnets and charms with them.  I ordered these lovely pendant trays, chains and a one inch hole punch (something I've wanted forever!) from Sun And Moon Craft Kits on Etsy.  I couldn't be more pleased with what came in the package!  I especially am glad that I gave in to the impulse to buy the colored chains, they are so fun! My daughter has already claimed the pink one, of course. It gives me a great deal of pleasure to buy from a fellow Etsy seller rather than just chucking more money at Michael's or JoAnn's.  Look for original art necklaces in my Etsy shop soon!

Monday, December 7, 2009

Amy Butler Pinwheel Ornament Craft


My kids and I were looking for something to do last week to get into the Christmas mood.  My Mom emailed me a link to make pinwheels designed by Amy Butler.  They looked very festive and we thought we'd give it a try.  You can guess from the picture above that all was not as easy as it seemed.

This pinwheel was crafted by my 11 year old son.  Done was better than perfect as far as he was concerned.  But I think those Amy Butler craft testers must have 3 hands because this craft was really very tricky.  I decided to re-do the craft tutorial for those of us who are 2 handed.


You start off with a 12x12 sheet of cardstock and measure it into strips that are about 1.5 inches wide.  Glue or tape the strips end to end to make a continuous strip.

Take a pair of fancy scissors and cut the edge of the strip.  Then you fold the strip accordion style.
 Now comes the tricky bit. 
Open it up until it fans out.  Ours kept springing open and it was extremely frustrating.  After this happened a few times and everybody was good and aggravated, I came up with the idea of this extra step.  Put some glue on the cut edges and stick a small rectangle of extra paper to make a sort of book-binding.  I'm showing it here in white so that it's easier to see, but I recommend using the same color

When you've got your pinwheel fanned out, tape the two edges together to hold it in place.  Then, glue a circle onto the front.  Amy's people used a large circular hole punch.  I don't have one of those so I just cut my own.  The one on the right is a bit wonky looking.  Note to self, buy a big circle hole-punch.

Punch a hole, attach some thread and hang on a tree. 

Friday, October 16, 2009

Busy-ness

So what haven't I been working on since October 6th? It's amazing how when you've got things to do, the time just flies on by.

This angel is part of a digital Nativity Matroyshka set that I designed for Express Yourself Vinyl. I love the sort of job where someone has a good idea, and then it all just pops into your head. I may offer a smaller digital collage sheet of the whole set. Packed up and ready to go are two of my best drawings Minty Leafy and Tres Fabu. They are going to be shown this weekend at my Alma Mater WVWC as part of an alumni invitational art show at the Sleeth Art Gallery. They don't have any pictures of the alumni show up yet. I hope they do, I want to see who else submitted something!

This week I worked on a set of icons for Dream Press Online. Go over there and take a peek, they sell adorable stationary and Christmas is closer than we like to think ;) It is so cool to see what I've made adding personality to this business and website.
This is my weekend to put some time into Halloween costumes. This year Ryan is going as Mario. This is a set of blue flannel overalls in the works. I'm going to have to make a red hat too--but one thing at a time!
While I sewed, Katie came in and started a craft of her own. I love to see my kids being creative!

Katie's crafts are usually made with cheerful smiles both by her and put into her creations.She made this adorable kitty cat (wearing a witch hat with a feather) out of felt, buttons and pipe cleaners. I love it!

Tuesday, March 24, 2009

checked off


Sending your procrastination confession out into cyberspace can be a great motivator to start checking tasks off of your list. Here is Miss K. on her new ladybug bean bag. Note the small ladybug in her hand.

Here are the two Goodwill shirts on which I used Celtic Mommy's freezer-paper stencil tutorial. They came out really nice, almost like a real silkscreen! I cannot decide whether or not to keep them or sell them. Here is my once favorite yellow t-shirt. I spilled coffee dead center in the middle so it's getting a little paint too. I'll post when it's done. Now, back to finishing off that list!

Thursday, December 25, 2008

About This Blog

Jennifer Addotta is a doodler at heart. As a child, the margins of her notebooks and schoolwork were often filled with inky abstract shapes. Filling entire pages with curving abstract line art was (and still is) a favorite way to spend her time. Her traditional drawings, created with ink and Prismacolor Markers, are both vivid and vivacious. Her digital work is a further exploration of line and color.

Born near Pittsburgh Pennsylvania, Jennifer grew up encouraged in her artistic abilities. From an early age, Jennifer  was exposed to sewing and fabric by her mother who passed on her knowledge as an accomplished seamstress and quilter. Young Jennifer was not that enthusiastic about sewing, but eventually came to appreciate having been given those same skills

Jennifer attended West Virginia Wesleyan College in 1987 set on a major of fine arts. In her junior year, she switched her major to fashion merchandising, graduating with a Bachelor of Science in this field. Her favorite class out of that curriculum was textiles.

After taking time off to raise a family, Jennifer discovered Adobe Photoshop and knew right away that this was another medium with which she had to become involved. Self taught in this program, Jennifer returned to her roots in fiber arts by designing fabric and repeating designs. She alternates between digital and traditional art.

Currently she resides in York, PA where she draws and designs.

Friday, October 24, 2008

Halloween Costume Tutorial--Pikachu Pokemon Easy!

Halloween Hurry Up!

Last night was the Fall Fest at our highschool. I had 2 costumes done and ready to go--more on the lovely flower costume later--when my son informed me that he wanted to be Pikachu. That night. Not to worry, I banged this out in and hour and it would've been even less time had I had a yellow hoodie. Hoodies = easier costumes. I thought I'd share with the rest o' the world.

You will need: A yellow hooded sweatsuit, a large empty cereal box, 3 rectangles of yellow felt (or 5 if you didn't have a hoodie), 2 squares of brown felt (OR some cheap brown fleece from 2 other projects--getting my money's worth out of that brown fleece!) and a square of black a hot glue gun or a bottle of fabric glue.
Step 1. Go on Google and find yourself a couple of Pikachu pix for reference.

Step 2. Cut your cereal box down the side so it's one big piece. Draw and then cut out a lightning bolt shaped tail.


Step 3. Put some glue onto the top2/3 of the tail and lay a piece of the yellow over it. Flip it over and cut out around the edges. Repeat for the other side. Put some glue on the remaining part of the tail. Position your brown felt flush against the yellow, flip it over, cut around the edges and repeat for the other side.

Step 4. Cut out some pointy ear shapes from the remainder of your cereal box.


Step 5. Glue on the yellow felt, as you did with the tail, leaving a diagonal bit at the top. Once you have both sides of each ear glued with the yellow felt, glue some of the black at the remaining part at the tips.


Step 6. To make a hood--skip if you've got a hoodie already--sew together your remaining two pieces of yellow felt together at the top and down one side in an *L* shape. Turn it inside out and viola! Insta-hood! Pin your hood to the collar of your yellow shirt. Glue or pin the ears onto the hood .
Step 7. Pin your tail to the seat of the yellow sweatpants and also to the mid-back of the sweatshirt so it sticks out at a right angle from your child's back.

Step 9. Use lipstick or Halloween make up to draw 2 red circles on your child's cheeks and you are ready to go! 
Related Posts with Thumbnails