
Showing posts with label designing. Show all posts
Showing posts with label designing. Show all posts
Tuesday, September 17, 2013
Tuesday, October 30, 2012
Mollie Makes Birds
So my family and I made it through Hurrican Sandy OK, we didn't lose power or anything.
Being stuck inside all day gives you time to work on projects. One of my projects is to design a bird fabric for Spoonflower's fabric of the week. The theme is birds or flight and the winner gets their fabric on Mollie Makes a cool British blog/magazine.

Rough sketches of whimsical birds.
The contest is palette restricted which means my design can only use these four colors chosen by Spoonflower or Mollie Makes or both. I like these choices, they're cheerful and soft.


Tuesday, July 10, 2012
From Design to Fabric!
.JPG)
.JPG) |
| This bunch came out perfect! |
.JPG) |
| These were disappointingly purple but wouldn't you know, dang it, that they look BLUE again on my monitor, 'cept the Eggplants, they're straight up purple and not giving it up. I am going to have to make a conversion chart. |
Friday, July 6, 2012
Save Your Doodles!
One question that artists hear often is "Where do you get your ideas?" A lot of the time I get them from my subconscious.


And from design into Fabric!
.JPG)
Wednesday, June 20, 2012
Subtle Design

Saturday, January 7, 2012
New Collection

You know that feeling of I-don't-know-what-I-want-but-I'll-know-it-when-I-see-it? Ages ago, I created the above design "Star Wishes." I was thrilled with it and I knew there was potential for a whole collection with this design as the central piece. I figured it'd be easy to develop a collection around it as I loved the colors and design element of playful stars. Actually took me a whole year. I created designs but they wouldn't quite fit the overall feel. Finally, I found the "piece" that fit and The Star Wishes Collection is finished!
Finally, I found the "piece" that fit and The Star Wishes Collection is finished!Friday, November 4, 2011
Squirrel Nut Papers

Just posted in my Etsy shop. I'm so excited about my newest paper collection! I wanted a little polka dot but something a little more fun and so I came up with a tiny acorn. You can't have acorns without squirrels and there's always room for paisley. I'm not so sure about the orange though. What do you think? I'm thinking about a second collection with a different color. Blue maybe. I am running a contest on my FB page in which you may be able to download one of these papers for free!
Saturday, September 3, 2011
Oh Gee, it's another ogee...

A doodle I did at work.

Cleaned up and colored in Photoshop. I'm not entirely of sure I like this color scheme. I was going for Autumnish colors. That's the beauty of layers though. You can change it really fast.
Monday, July 18, 2011
Sodie-Pop


Thursday, July 14, 2011
A Snip of an Idea


I've been trying to draw more people lately. This goth girl was inspired by a friend of mine on Deviant Art who combines her doodles and people quite effortlessly. I'm sure I added too many cheerful colors for it to be truly goth. Sometimes you get several ideas at once. Once I'd finished "Much on My Mind" the little pink-orange-peach-brown paisley tucked in behind her wouldn't be ignored and so it became a new pattern idea named "Sodie Pop." Not at all brooding and dark.
Monday, May 2, 2011
Making a Set of Patterns Tutorial
After you've mastered making repeating patterns, you may need to use them again and again for mockups or digital scrapbooking or similar. However, if you just leave every pattern you create in your patterns palette it will considerably slow down your computer when you try to run Photoshop. But reopening every jpeg tile and doing edit>define pattern is tedious. Making a pattern set that you can load when you need it is much more convienient.
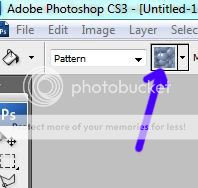
*Open all of the tiled patterns you want to use and save them to your patterns palette by clicking edit>define pattern. You don't want to open and save every single pattern you've ever made all at once though. As I said before, too many patterns in the palette will slow everything down. Group them together by category i.e. Halloween or Florals or group them as collections that all fit together.
 *In Photoshop, click on the patterns palette to open it. Then click the little black arrow on the right side of the box to open the options. Choose preset manager from that drop down menu.
 *Now delete any of the pre-made patterns that are already in there that you don't need to be part of your new group. Don't worry, you won't be deleting them from Photoshop altogether, just from the new group. Hit your ctrl button to select more than one at the same time. Be careful not to accidentally select any of the new ones.
 When you have only the patterns you want hit ctrl>a to select them all and click save set.
 Photoshop will automatically save this grouping in its patterns file. All you need to do is select a name. When you want to use them open the patterns palette, and click load patterns from the drop down menu. It should take you right to your saved files and you can load it from there.
*Open all of the tiled patterns you want to use and save them to your patterns palette by clicking edit>define pattern. You don't want to open and save every single pattern you've ever made all at once though. As I said before, too many patterns in the palette will slow everything down. Group them together by category i.e. Halloween or Florals or group them as collections that all fit together.


Monday, November 22, 2010
Not Following
So, I have an Excel chart of people to whom I've sent submissions and licensing inquiries. Listed on the chart is are dates that I ought to have followed up with them. As of yet, I've not followed up with anyone. The reason for this is that everytime I think about calling a stranger on the phone I
1. feel like I might puke.
2. Have only a vague idea of what I would even say and this would consist of many Ums, Uhs, You knows and "Hi, my name is..." before probably hanging up on them.
So this week I've been catching up on some mending. I won't bore you with pictures of it. If you want to be bored, you can go read my tutorial about sock darning which I still say is a useful topic albeit dull one. And, I've launched four different Christmas paper packs in my Etsy Shop, changed my background on Twitter, this blog and Etsy to a Holiday Festive version of my Candy Dish Paisley design.
While you ponder all of that, please enjoy this drawing of a fancy shoe from my sketchbook.

1. feel like I might puke.
2. Have only a vague idea of what I would even say and this would consist of many Ums, Uhs, You knows and "Hi, my name is..." before probably hanging up on them.
 |
| I think I have Telephobia. |
So this week I've been catching up on some mending. I won't bore you with pictures of it. If you want to be bored, you can go read my tutorial about sock darning which I still say is a useful topic albeit dull one. And, I've launched four different Christmas paper packs in my Etsy Shop, changed my background on Twitter, this blog and Etsy to a Holiday Festive version of my Candy Dish Paisley design.
While you ponder all of that, please enjoy this drawing of a fancy shoe from my sketchbook.

Thursday, September 2, 2010

Wednesday, August 25, 2010
Mock Journal Tutorial
Journal Mockup Tutorial.

You will need Photoshop (or a similar program) and a good working knowledge of how to use it to do this tutorial.
I had a lot of fun doing this mockup and I was very pleased with my results. Many of the companies to whom I've been submitting my designs make fancy journals so a mockup of a nice journal seemed appropriate.


2. With your marquee tool, square up the left side so that it has sharp corners.


3. Duplicate this layer, close the 'eye' to make it invisible and then switch back to the original layer. Click on the little checkerboard square up in the top of the layers palette to lock your shape.


5. Now here comes the fun part, making some pages for your journal! Choose and capture your paper shape with the marquee tool. Then, with the shape still captured, in the tools palette change it to the wand.

6. Simulaneously hit ctrl>shift>alt> and the Up arrow key. Look what happens! PS makes a duplicate of your shape and piles it on top of the first one. To make the perspective a bit better you'll want to move the shape over while it's still selected. Hit 'V' and move it over.

7. Repeat step 7 until you have a nice stack of pages.

8. Let's make our paper look like it's been read a few times. Go into your Filter palette. Choose Filter>Distort>Pinch. Set your slider to the left at about -25% and click 'OK.' Now our paper stack looks a little less rigid. With the burn tool, shade the pages on the sides a bit to add some shadows, especially on the corners.

10. Turn your 'cover' layer back on then choose a pattern for it. If you have repeating tiles saved in your patterns palette you can just pour it in with the bucket tool. Or, you can open and drag your design into a new layer above your cover shape and then trim it to fit using the wand tool in the layer below. Line it up over your pages.

11. Go down to the lower left corner of your journal and, with the pen tool, make a curved line around the edges of your pages to make it look like book binding. Go into the pages layer and shade them a bit where the binding would make a shadow.


13. With your pen tool make a few vertical lines through it in a darker shade. Trim off the edges so they're flush with your cover and use the burn tool at the ends for shadowing.
14. Create a new layer and with the round marquee tool, make an oval. Hit ctrl>backspace to fill it with the color of your choice and and in the layers palette choose layer>style>bevel & emboss.


17. Choose some text or a monogram, center it over the oval and you're done!
Now you're ready to wow stationery companies with your designs. Thanks for reading!
Saturday, August 21, 2010
Still not too early... I think.

Making Mockups is almost as fun as sewing real clothes. Wouldn't you love to have a party dress like this for your daughter? I would too. I just can't decide which one I like best.
Tuesday, August 17, 2010
Paisley of the Week! Not Too Early - no, really!


There's no time like the present to get going on your holiday stuff. Here are two of the same paisley with two different feels to them. Halloween and Christmas. I'm partial to the Halloween one.
Both of these designs were born out of this one doodle. I left off the fussy bits around the edge because it looked less cluttered with the design.

Friday, August 13, 2010
The cure for Slooow Mo Joe

Lately, my computer has been super slooooooww. I've been worried that it was a virus although my anti-virus hasn't noticed anything. Photoshop has been particularly troublesome starting out a bit pokey and ending up taking up to FIVE minutes to load. I'd turn it on, get a drink, unload the dishwasher, allow myself to be distracted by the TV for a bit, come back and it'd still be trying to get it self started. And shutting down was the same story. About five minutes to close and any other program I wanted to run just had to wait.
Yesterday morning I was not quite awake, so while waiting for my coffee to take effect I sat there sipping and absently watching it load. It started out going through all of its photoshoppy things and then it got to the part where it loads the patterns and there it stuck....reading patterns.....reading patterns.....reading patterns. It read them for a full three minutes and then *click* the lightbulb went on (I said I wasn't awake yet.)

All of the patterns that I've been creating, I've just saved in the patterns pallette. I must've had about fifty of them in there. Apparently instead of just using them as I need them, Photoshop loads them all. It would be like taking out every piece of fabric you own, unfolding it and lining it up all around your sewing room whether you were going to use it or not. Then, when you were done with your project, you'd have to fold all of it back up and put it away again exactly as you found it.
So the moral of this story is: If you've used my repeating pattern tutorial, and subsequently noticed a slow down in your Photoshop, go into your patterns pallette and reset it (but make sure you have your tiles all saved somewhere else.) After I did this BAM, Photoshop closed itself right down. For the sake of experimentation I restarted it and it took less than a minute to start. And my laptop began running faster as well. Who knew that having a full pattern pallette could cause such a problem?
Subscribe to:
Posts (Atom)
