Showing posts with label paper. Show all posts

Thursday, October 27, 2011

Paisley of the Week! Top This!


Cupcakes are not just for bringing into your kid's class on birthdays anymore.  There are whole shops dedicated to just cupcake making; one just opened up around the corner from where I work.  This philosophy makes much sense.  Why have just one cake and cut it all up when all of your guests can each enjoy their OWN personal confections?  Still, they need to choose between the having and eating.  Making this a choice little easier are adorable cupcake toppers like these which I found in an Etsy Shop called Paisley Tree Creations.  You can savor your treat and save the prettiest part forever! 

Thursday, March 31, 2011

Flowers vs. Snow

Every year the same thing happens:  You think spring is coming, you even see little bits of green starting to push their way through the ground and you're like "It's getting warmer!  Can't wait!" Then....it snows.  Ha ha, April Fool courtesy of Mother Nature. 

The other day one of the kids at work asked me to show her how to make a snowflake.  Urgh.  I didn't want to see any more of those things whether they be actual frozen water or just paper.  So I said I'd show her how to make a flower to color instead and it came out great so now I'm going to show you.


You will need:  an 8 x 10 piece of paper, scissors and nubby, broken crayons with the paper all peeled off.


* Square your paper off.  Fold the bottom corner over to one side like this and cut off that extra bit like this to make a big triangle. Save that extra piece for later!

* Fold your big triangle in half and then fold that one in half.
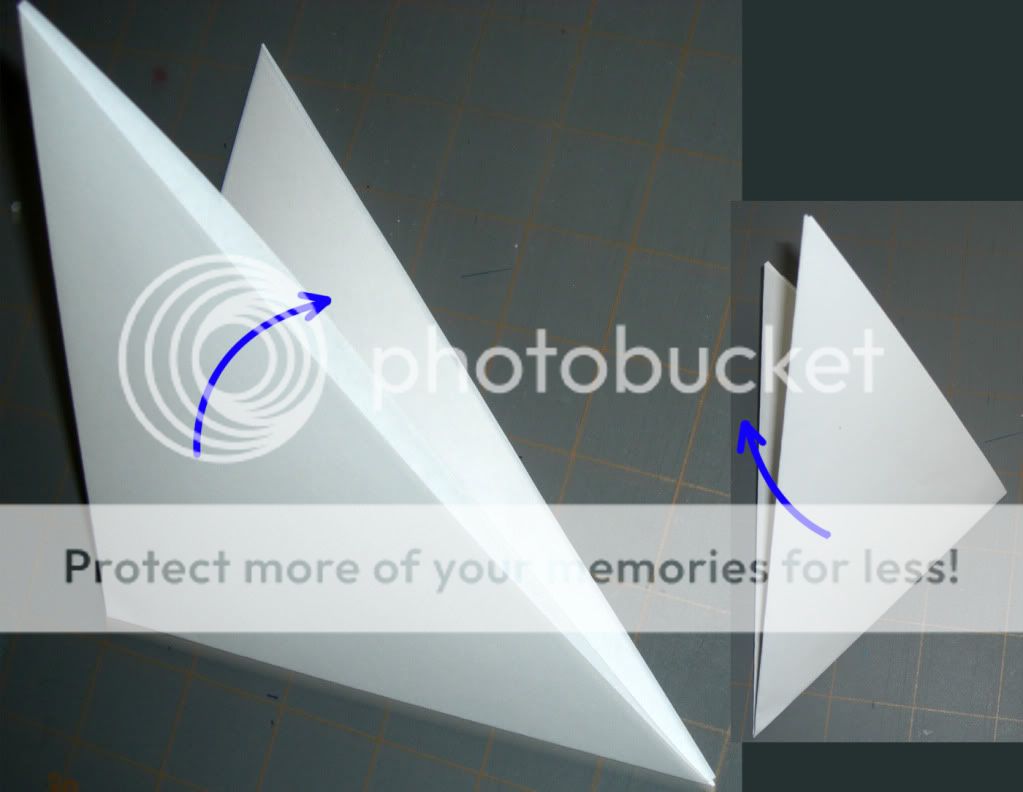
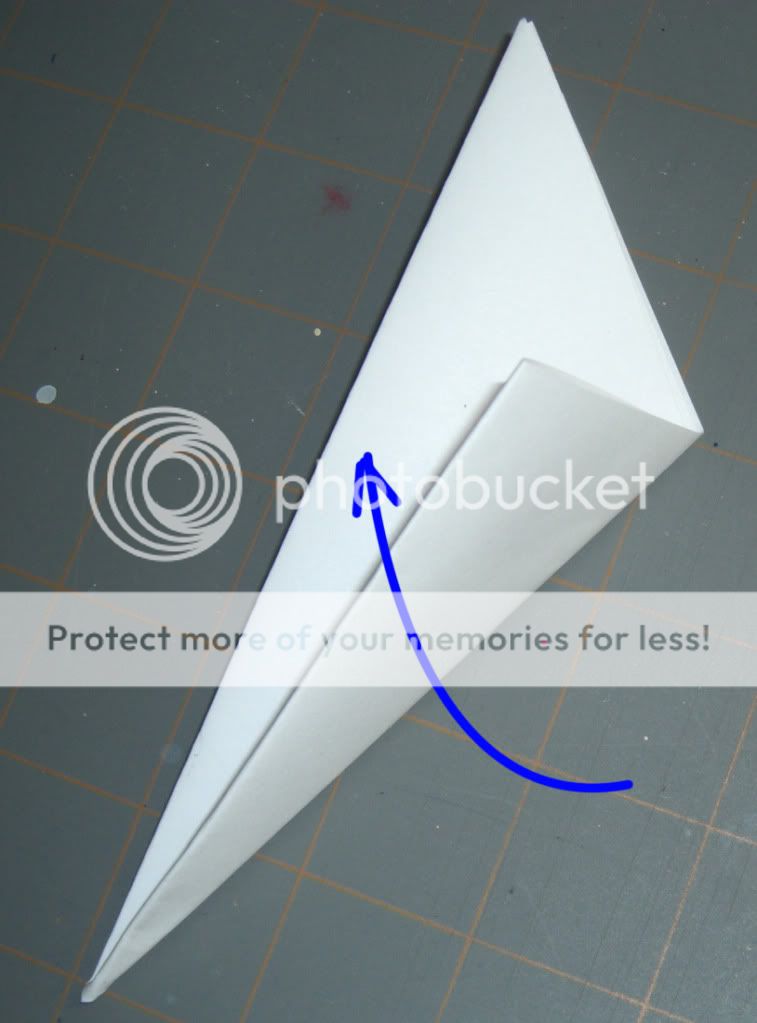
*Now the tricky bit.  Fold the top of your triangle (the side with the fold) over toward the cut edges of the triangle.  It makes this sort of wonky icecream cone shape.
* Cut the top off of the "icecream" so it's now just a skinny triangle.

* Now make the top a little more interesting.  You can round it off, make it jagged or do a swoop like I did.  You can also make some little cuts up the sides and cut the bottom tip off if you like or leave it smooth if you'd rather not.

 * Open it up and it'll look like a snowflake. 

*Take your crayons and rub them from the center to the edges like the spoke of a wheel.  The crayon will be darker on the edges. 

If  you use more than one color it makes a cool gradient effect.

*Take the extra bit from the side that you cut in step one, and make a leaf or two.  Color it in and add some details.

Now make a whole bunch of them and tape them onto your window to blot out leafless trees and brown grass!

Friday, January 22, 2010

They're Done!

Coming Soon to an Etsy Shop near you!  Don't they look great? The first 3 on top are available as prints too.

I'm featuring this one in particular because I used 'scrambled papers' instead of just the unlined white that the other three have.  I think it's quirky, but  do people need all of one sort of paper in a notebook?  Or are the majority of notebooks  that way simply because they've always been made that way?  I'd have really liked to have bought some orange paper to go with the Tangerine Tango covers, but I somehow didn't get around to it.  Next time!

Friday, January 15, 2010

Take Note!

 I like the idea of making my own notebooks--complete with original artwork.  That makes it art with function.  I just need to buy a ream of paper to fill them all, have them bound and they'll be up on Etsy.  I'm toying with the idea of making one of them a scrambled paper book--graph paper, blank paper, lined paper maybe even a few decorative papers all thrown in together.

Monday, December 7, 2009

Amy Butler Pinwheel Ornament Craft


My kids and I were looking for something to do last week to get into the Christmas mood.  My Mom emailed me a link to make pinwheels designed by Amy Butler.  They looked very festive and we thought we'd give it a try.  You can guess from the picture above that all was not as easy as it seemed.

This pinwheel was crafted by my 11 year old son.  Done was better than perfect as far as he was concerned.  But I think those Amy Butler craft testers must have 3 hands because this craft was really very tricky.  I decided to re-do the craft tutorial for those of us who are 2 handed.


You start off with a 12x12 sheet of cardstock and measure it into strips that are about 1.5 inches wide.  Glue or tape the strips end to end to make a continuous strip.

Take a pair of fancy scissors and cut the edge of the strip.  Then you fold the strip accordion style.
 Now comes the tricky bit. 
Open it up until it fans out.  Ours kept springing open and it was extremely frustrating.  After this happened a few times and everybody was good and aggravated, I came up with the idea of this extra step.  Put some glue on the cut edges and stick a small rectangle of extra paper to make a sort of book-binding.  I'm showing it here in white so that it's easier to see, but I recommend using the same color

When you've got your pinwheel fanned out, tape the two edges together to hold it in place.  Then, glue a circle onto the front.  Amy's people used a large circular hole punch.  I don't have one of those so I just cut my own.  The one on the right is a bit wonky looking.  Note to self, buy a big circle hole-punch.

Punch a hole, attach some thread and hang on a tree. 
Related Posts with Thumbnails