Showing posts with label patterns. Show all posts

Monday, May 2, 2011

Making a Set of Patterns Tutorial

After you've mastered making repeating patterns, you may need to use them again and again for mockups or digital scrapbooking or similar.  However, if you just leave every pattern you create in your patterns palette it will considerably slow down your computer when you try to run Photoshop.  But reopening every jpeg tile and doing edit>define pattern is tedious.  Making a pattern set that you can load when you need it is much more convienient.
*Open all of the tiled patterns you want to use and save them to your patterns palette by clicking edit>define pattern.  You don't want to open and save every single pattern you've ever made all at once though.  As I said before, too many patterns in the palette will slow everything down.  Group them together by category i.e. Halloween or Florals or group them as collections that all fit together.

*In Photoshop, click on the patterns palette to open it.  Then click the little black arrow on the right side of the box to open the options.  Choose preset manager from that drop down menu.

*Now delete any of the pre-made patterns that are already in there that you don't need to be part of your new group.  Don't worry, you won't be deleting them from Photoshop altogether, just from the new group.  Hit your ctrl button to select more than one at the same time.  Be careful not to accidentally select any of the new ones.

When you have only the patterns you want hit ctrl>a to select them all and click save set.


Photoshop will automatically save this grouping in its patterns file.   All you need to do is select a name.  When you want to use them open the patterns palette, and click load patterns from the drop down menu. It should take you right to your saved files and you can load it from there.

Thursday, June 24, 2010

Make Your Own Mockup Template Tutorial

You should have Photoshop (you can also use GIMP, CorelDraw, or Photoshop Elements) and a good working knowlege of how to use the program to do this tutorial.

Tearsheets of items showcasing your artwork gives a company or an Artist Representative an idea of your vision.  Mockups with your designs show that you have given some thought to how your work can increase the saleability of their products.  This tutorial will show you how to make your own reusable mockup template.
1. Start with an item that is a solid color, preferably white or very light color.* You want to photograph this item against a dark background if possible and from a mostly full on angle. On my camera, I used the macro setting.


1a. Once you've taken your picture and downloaded it into your computer, open it up in Photoshop. Save the new PS document as "mockuptote.psd" to use again. You don't want to go blowing up a potential customer's inbox with a lot of huge files so resize your photo to 72 dpi and about 5" x 7". A mockup is only to illustrate how your designs can be used; it doesn't need to be high-res.

 2. If you've photographed your item against a solid dark background you should be able to use your wand tool to just select the entire background. If that's the case your job is easy. Select it and then go into select>inverse and cut and paste your item into a new layer named "tote" (or mug or soapdish or whatever.) Magnify and check around the edges for any stray pixels that may have been left behind and clean them up.
2a. If your background is not solid enough to select all, use your pen tool to select the shape of your tote, then cut and paste it into a new layer. Delete the rest of the photo that you won't be using by going to that layer and hitting ctrl>backspace to fill it over with white.

3. Make another new layer and name it "print."

In this new layer, with the pen tool, select the area where you want your design to appear and fill with white.  *At this point, if the subject is not entirely white, go back down to the original photo layer and use your sponge tool to take the color out of the selected area.  
In the upper left of your layers palette select the lock button. I made a similar layer for the handles and bottom of the tote.
 
4. Now you can put your design onto your tote. There are two ways to do this:  
 Open the design you want to use and then drag and drop it into a layer above the "print" layer. Resize, crop and shift it around until it's how you want it.

Go back to the print layer and using your wand tool, select the area around your print templates. Go back up to your artwork layer and hit ctrl>x to remove the excess. I've shown it in red here so it's easier to see.
* Update, you can also use the clipping mask to do this but I am not well versed with the clipping mask tool (yet.) When I have mastered it, I will include those instructions too!


If you've already saved a tiling design into your pattern palette use your bucket tool to pour your design right onto your "print" layer. 


5. Go into your layer palette and change the layer style to "multiply."

 It now looks as if it's been printed on the tote all along. 

 6. Then, when my mockup looks like I want it, I save it as "mockuptotebluefans.jpg" and put in the same file folder that contains that particular design.  That way I can see my mocked-up products grouped together all at once.

If you don't have, or want, to take the time to make your own mockup products, check out Tara Reed's Mock-up Magic software. It looks very user friendly and there are dozens of items from which to make mockups. But since I'm cheap, I do my own templates and I thought I'd share how to with you.  Let me know if this tutorial was useful, thanks!

Saturday, April 10, 2010

About my Glorious design...

When I posted this last week it was an experiment to see if  any of my blog readers would notice--seeing as it was Easter and all. Nobody said one way or the other so I'll just hope you did. 'Glorious' is an abstract design but it's made up of Christian symbols.  For those of you who like search and find-y things, in the design are:

fish
lillies
turbulent water
doves
The Trinity
a cross
the letters 'J' and 'C'

I started off with the fish and worked the other elements into it.  As you know, the fish was a secret symbol for Christians to identify eachother. In today's society, being a Christian is somewhat 'uncool' for the mainstream--unless you're Miley Cyrus.  Or for some Christians, like me, faith is something more private. 

Sunday, February 14, 2010

Creating Repeating Patterns in Photoshop Tutorial

Happy Valentine's Day, everybody! 

Want one of those perfect repeating background tiles you’ve seen on someone’s Twitter
or MySpace? Or, in my case, the knowhow to make a continuous repeat for a textile
pattern to upload to Spoonflower so your design doesn’t look like a block print?
Let me reveal the mystery!

First choose a picture you want to repeat. I chose “Minty Leafy.”

Next, make note of how big your image is. Go into Image>image size.
Divide those numbers in half. If you’re like me--not a numberish person--
write them down.


Now, go into Filter>other>offset. Put the two new numbers into those
boxes. Make surethat ‘wrap around’ is checked off.


Your picture will now look like this with the four end corners
turned inward. Manipulate it so that it joins up on the ends.
Move some stuff around, cut and paste, use your patch
tool--whatever you need to do.


When you are satisfied with your alterations. Hit ‘Ctrl F’ to turn
your picture right sides out again.
You always want to do this because there may be something
you’ve missed. Right here I see that I’ve missed a bump on the edge that
would make a flaw in my repeat.


Okay! It’s good

I bet you’re dying to see what it looks like. I used to cut and paste over and over
and do the repeat myself which resulted in flaws and took a looong time.
There is an easier way!
Select your whole image with the marquee tool. Select Edit>define pattern. It’ll
pop up and ask you what you want to name your new pattern. I let PS choose a name
for me...
Sometimes ‘define pattern’ will be grey and unchoosable in the menu.
Just crop the image to the edges. You can do this by choosing Image>crop.

Some other reasons the ‘define pattern’ option is unavailable:
There are too many patterns in the menu. Choose pattern>reset patterns.
Your image is too big. Resize by hitting ‘Ctrl T’ and using the bounding box.

*Update:  I've discovered that having too many patterns in your patterns palette will considerably show down Photoshop and even your computer.  After you are done with a project reset the patterns to declutter your PS.


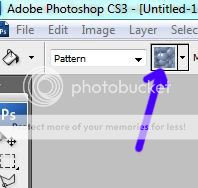
Now open a new document that is larger than your image. Choose the bucket tool,
check off ‘pattern’ and click. You now will see your design repeated. Look it over
to see if there are any flaws you may have missed--but if you’ve caught
everything--it should look like this!

And there you have it. Let me know if you found this tutorial useful.
Thanks for reading!

***UPDATE  Want to save all your new patterns together in a set that you can reuse when you need it?  Here's how in my new tutorial!
Related Posts with Thumbnails