Showing posts with label web design. Show all posts

Monday, April 9, 2012

Part 2: Getting Your Webpage Online

In part one of this tutorial, I showed you how to create a basic, no-frills webpage. So now what?
Now, we’re going to perform the amazing feat of getting the page you created from your computer onto the internet so other people can go to it!

1. When your page is just right, it’s time to get it onto your domain. Go onto your Web domain’s Control Panel and find the ‘File Manager’ screen. It may be a little different for every Webhost but somewhere there’s a button or menu option to upload files. Upload the file named Index.html into the main directory. The main directory is usually called ‘root’ or maybe it's always called 'root.' I haven't looked on every Webhost's file management system. If it's not called 'root' on your file manager, look for the top file that contains all the other files.
2. Now, take a look! Open a new window and type the address of your website into the browser. You should be seeing a bunch of white boxes, with x’s in the corner, where your images should be. This is the part of the process that caused me at least a day’s worth of aggravation. In the immortal words of the Beatles: It took me soooooooooo long to find out, but I found out! If this tutorial saves even one person the tooth gnashing and severe frustration I experienced then it will be worth it!

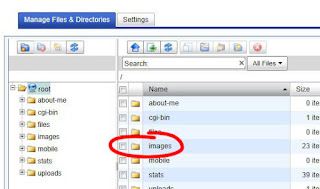
3. “Why are my images not showing up?” you ask. It’s because you haven’t uploaded them yet. Nobody tells you this, it's like a big fat secret, or maybe they assume that you know. I certainly didn't. I found out because I noticed, quite by accident, on another tutorial I was looking up, that there was a file called 'images' in the author's web directory. I made the correct guess that I should have one too. Your File Manager might already have a file named “Images” or it might not. Either way, you need one. If there’s already one there, great. If not, create one right there in the root directory.

4. Now, in the same file location on your computer where your Index.html file was saved there should also be a file named “Images.” When you did the “Save for Web & Devices" action Photoshop very kindly created this file automatically. When you open it, you’ll see your web design but cut up into bits and pieces. Don’t worry, it’s supposed to be like that and your domain server knows how to reassemble them so they look whole again. All you have to do is upload all of those little image pieces and put them into the Images file. There are a couple of ways to do this. If you have an FTP program, it can upload them all at once into the Images File or you can upload them one by one to the root directory (which takes much longer) then move them into the Images File yourself.

5. That’s it, your webpage should be live now! Re-open the window, type the address of your website and you should see your webpage -- Yay!

Tutorial: Create a Webpage With Photoshop part 1


This is how I created my webpage. It took some trial and error and at times I
was seriously Bent Out Of Shape. There was was no one tutorial with all the steps I needed to do. I thought I’d share what I learned so that other struggling DIYers could avoid the frustration! This tutorial just covers your basic landing page with active links. Anything with fancy bells and whistles you’d better get someone else to show you or, if you can afford it, do it for you. There are
a lot of steps but they are not hard steps.

1. I am assuming that you already have a domain name and a webhost already. Some
companies will even offer free, basic web hosting if you buy your domain through them. (Sometimes the catch is they slap their big dumb logo on top of your page, though. Not cool, Go Daddy.) Some hosting companies, like iPage, will offer free website building software that you can drag and drop your pictures and links into a template and it’s super easy to use. The downside is that their templates cannot be altered. I wanted things my way so I did it the hard way. It’s not too hard though! You can do it too!

2. Open a new document in Photoshop. It should be 1040 pixels by 768 pixels. This is the standard size of most computer screens.

3. Name your document exactly the name of your website. If your website’s name is ILuvDoodling.com then that should be the name of the document. The reason for this is that later, when your page is live online, this name will appear on the search engine tabs. If you name it something like Webpage Design.jpg then that name will appear on the tabs and that’s confusing.

4. In your Photoshop document create a background. For now I suggest that you make our background white. When you get your page online, on some computers there will show a large white chunk on the side if the screen resolution is larger than 1040 pixels wide. I have not figured out how to avoid this. If you know, or find out, post the solution in comments!*

5. Add your logo, a banner with the name of your website and some text that will ater be made into clickable links such as: Etsy Shop, My Blog, Gallery etc. and space them out a bit.
6. Once you have your page looking the way you want it, flatten any layers, and save. (You
should probably also save a PSD file with the layers intact if you want to update things later.)
7. Now comes the web-pagey part! Over in your toolbar there is a tool called “Slice Tool.” Select it. Use it to drag boxes around anything that you’d like to be a clickable link.
8. Once you have a slice box around everything thatyou want to be a link, go back over to the tool bar and right click on Slice Tool. From the little drop down box, click “Slice Select Tool.” Each of your slice boxes has a little blue square with a number in it. Double click this and a dialogue box pops up. Where it says “Name” type the name of your link. It should be the same as
whatever the text on the page says i.e. “My Blog.” Where it says “URL” type the exact web
address of where you want that link to go
. Click OK when you’re done. Repeat this step for each of the slice boxes.

9. Okay, now comes a tricky bit. Save your document, Ctrl>S. Now, go to File>Save>Save for Web & Devices. This big complicated looking box pops up but don’t be alarmed, all you have to do is click save BUT, and this is the tricky part, when you save it, you need to save it as a new file called Index.html. It doesn’t matter what your page’s name is. It MUST be named Index.html. The reason is that when you upload to your webhost, this is the standard name that every server uses to understand ‘hey, this means it’s a webpage.’ You name it anything else, it’s not going to know what you’re talking about and your page will not show up.


10. Find the document on your computer that you named “Index.html”
and click on it
. Ta-da! This is what your webpage is going to look like online. You can see it but nobody else can…yet! Take this opportunity to fix or move anything that you don’t like. Click on and test all of your links to see if they’re going to the right places. Notice up in the tab it’ll have
the name of that original document, even though you named it ‘html’ clever huh? I don’t know how it knows, it just does!
Part 2 tomorrow: Getting your webdesign online!
* I DID find out how to fix this but it's tricky and involves tinkering around with your page's HTML code. I found this tutorial by Dave Kristula that shows what code to write and where to put it.
Related Posts with Thumbnails